


When an irrigation system is designed to draw from a limited water source, it’s important to monitor the quantity of water in order to avoid pumping the source dry.
You can use a Baseline biSensor soil moisture sensor with your Baseline controller to monitor the water level in a pond or cistern and stop watering when the water drops below a specified level.
Perform the following steps to use a biSensor and a stop condition to shut down watering when water drops below a specified level in a reservoir.
Step 1: Installing the biSensor in the Reservoir
Take note of the serial number of the biSensor that you are installing in the reservoir. You will need this number when you program the controller.
For best results, position the biSensor vertically in the reservoir. It doesn’t matter which end is up, but mount the biSensor so the wires can be routed out of the reservoir. Make sure that some portion of the biSensor blade is below the water at the low water level.
Mount the biSensor securely so it does not move. Variations in the position of the biSensor will result in incorrect readings.
Follow the wiring instructions in the biSensor installation guide to connect the biSensor to the two-wire path or to the biSensor ports on the controller.
Make sure that you maintain polarity on the wire connections.
Fasten the wiring with wire nuts, and then test communication with the controller before you complete the installation with waterproof connectors.
DeleteStep 2: Programming the Controller
You can shut down the entire controller or a specific program when the water level reaches the low level.
Assign the biSensor
1. On the BaseStation 3200 controller, turn the dial to the Start, Stop, Pause position.
2. Press tNext or Previous to highlight the Moisture Control Setup option.
3. Press Enter. The Moisture Sensors screen displays.
4. All is highlighted in the Program column. Perform one of the following:
- To associate the moisture sensor with the full controller, continue to step 5.
- To associate the moisture sensor with a specific program, press + to move to the program number. Continue to step 5.
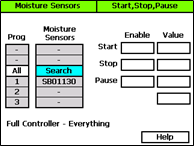
5. Press Next button to highlight Search.
6. Press Enter to search for moisture sensors. The serial numbers of the biSensors are shown in the Moisture Sensors column.
7. Press + or – to highlight the serial number of the moisture sensor that you installed in the reservoir.
Take a biSensor Reading
1. Make sure the water in the reservoir is at the level where you want the system to shut down.
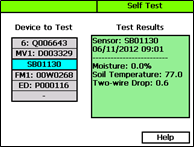
2. On the BaseStation 3200 controller, turn the dial to the Self Test position.
3. Press Next or Previous to select Test Single Two-wire Device, and then press Enter.
4. In the Device to Test column, press + or – to select the serial number of the biSensor that you installed in the reservoir.
5. Press Enter to test the biSensor. The test results display the moisture percentage.
6. Write down the moisture reading, and then turn the dial to the RUN position.
Configure the Stop Condition
1. On the BaseStation 3200 controller, turn the dial to the Start, Stop, Pause position.
2. Press Next or Previous to highlight the Moisture Control Setup option.
3. Press Enter. The Moisture Sensors screen displays.
4. In the Program column, press + to highlight the program that you assigned the biSensor to.
5. Press Next to move to the Moisture Sensors column. Press + to highlight the serial number of the biSensor that you installed in the reservoir.
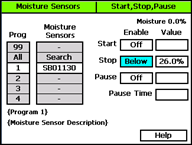
6. Press Next to move to the Enable column of the Start field. Make sure the value is set to Off.
7. Press Next to move to the Enable column of the Stop field. Press + to set the value to Below.
8. Press Next to move to the Value column of the Stop field. Press + to enter the biSensor reading that you wrote down from the test.
9. Press Next to move to the Enable column of the Pause field. Make sure the value is set to Off.
10. When you have finished making changes, turn the dial to the RUN position.
When the biSensor reading matches the value that you entered in the Stop field, the controller will stop watering and display a message on the Run Status screen.
|
|