


Table of Contents
Connecting the BL-5315B biSensor to the Irrigation SystemBurying the Original biSensorConfiguring the Original biSensor in the BaseStation Irrigation ControllerbiSensor Placement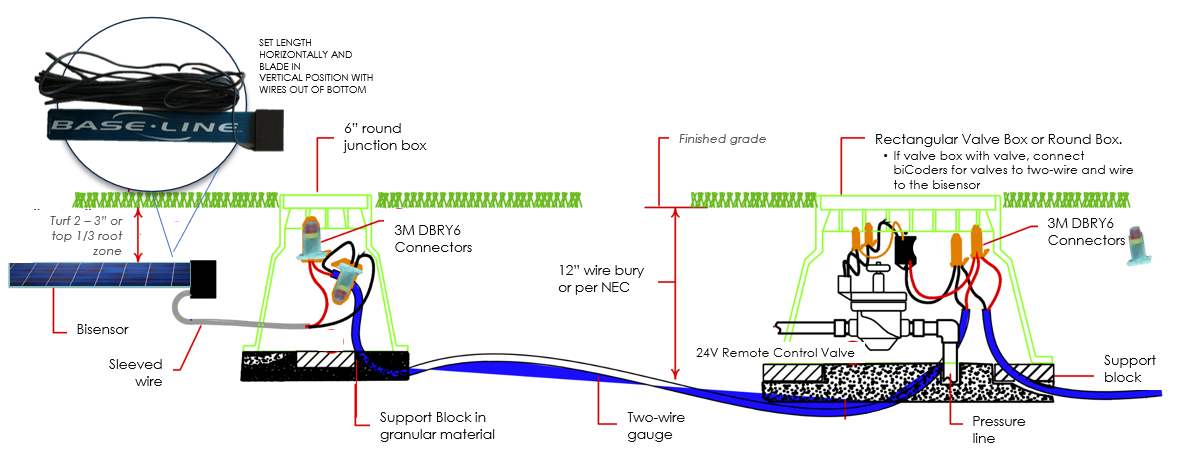
Connecting the BL-5315B biSensor to the Irrigation System
- Power off the two-wire when installing devices.
-
Connect the BL-5315Bto the two-wire guage.
- The sensor comes with 50ft of wire. If additional length is needed, use polyethylene double-jacketed or UF-B UL PVC double-jacketed two-conductor solid core wire designed for direct burial systems to connect the biSensor to the two-wire path.
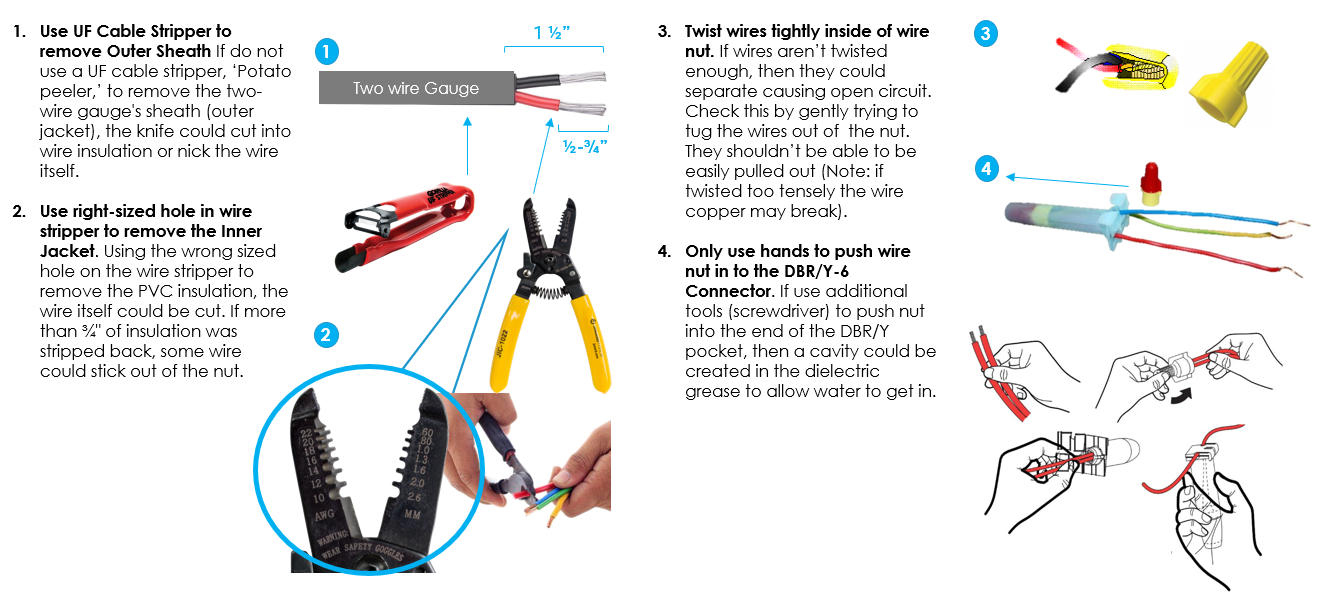
- Strip the outer insulation from the two-wire and the biSensor wire 1½”.
- Strip the red and black wires on the two-wire and the biSensor wire ½”.
- Use the wire nut to connect the two red wires together, then same method to connect the two black wires together, ensuring that polarity is maintained.
- Verify communications with the BaseStation before proceeding. Refer to the Configuring section below.
- Complete the installation of the 3M™ DBR/Y-6 moisture-resistant connectors by positioning each wire, with the wire nut, into the gel and firmly snapping the connector closed.
Burying the Original biSensor
- Select a location for the biSensor
biSensor Placement
-
The sensor needs to be placed in the effective root zone of the plant it is monitoring. Usually the sensor will be making the irrigation decision for many plants or even multiple zones of plants with similar water needs, so it should be placed in the effective root zone of a representative plant.
- Consider your various plant types. For most sites, the ideal scenario would be to place one sensor in the lawn, one in the shrubs, and one in the trees if these plant types are in separate zones.
- Consider how the zones of the property can be grouped.
- Group plants that have similar water requirements.
- Group zones of sprinklers that have similar water usage and delivery characteristics such as grass in full sun with rotors, or grass in full sun with sprays, or grass in shade with rotors, or grass in shade with sprays, or drip zones.
- Choose a location that gets equal to or ~below average. This is the primary zone. Be careful that the biSensor isn’t buried in an area that gets substantially more or less water in comparison to the rest of the zone.
- Do not bury the biSensor too deep.
-
Set up watering strategies using the controller's programming to monitor the zones with sensors.
- Refer to your controller’s user manual for information about configuring the watering strategies.
-
Cut a slit in the grass or soil for bisensor with a flat blade shovel. Widen the slit
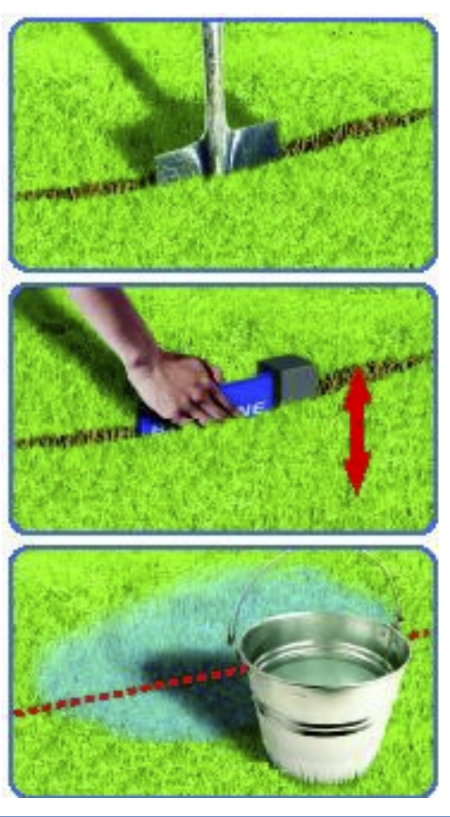 with a back-and-forth motion.
 -
Place the biSensor in the slit horizontally.
- In turf, position the top of the biSensor 2” to 3” deep. For other plant material, position the sensor in the top third of the plant’s root zone.
- Ensure there are no air pockets near biSensor by removing any rocks or gravel touching it.
- Firmly repack the soil around the sensor.
- Bury the biSensor wire deep enough to protect it from digging. Splices to the two-wire should be placed in a small valve box.
- Document the location of the biSensor and biSensor wire positions so they can be avoided when aerating and digging in the area.
- Saturate the soil surrounding the biSensor using a bucket of water to make sure the soil around the sensor is firmly compact.
- After burial, test the biSensor again from the BaseStation.

Configuring the Original biSensor in the BaseStation Irrigation Controller
After the biSensor is installed in the field, you need to configure it in the controller. Refer to the instructions in your controller’s user manual.
Test the biSensor from the controller to ensure that it is communicating. After you have saturated the soil surrounding the biSensor, test the biSensor again to verify the moisture readings.
Notes
- If adjustments or repairs are made, make sure they do not affect the proper application of water to the biSensor.
- Poor distribution will cause brown spots, or wet spots. You cannot compensate for distribution problems with sensor-based watering.