


If you have a Baseline soil moisture sensor (biSensor™) installed in your landscaping and connected to your BaseStation 3200 irrigation controller, you can program the controller to water based on the moisture levels in the soil. This watering strategy can reduce outdoor water use by up to 62 percent or more over traditional irrigation methods. And, by watering your plants when needed, you can increase landscape health, promote deeper root growth, and make your plants more disease resistant.
For areas that have a restricted schedule such as specific watering days or specific use schedules like sports fields, upper threshold (also referred to as “greater than limit” or “upper limit”) is a popular watering strategy. With upper threshold, you can choose which day and what time of day to start watering and the sensor will shut off watering when soil moisture reaches the upper threshold, which is usually slightly above field capacity.
The upper threshold watering strategy varies the zone water time each time the program runs in order to apply enough water to raise the moisture level to field capacity. Soak cycles are critical for this mode because the controller monitors the moisture level as water is applied. At the end of each soak cycle, the controller determines whether an additional water cycle is needed. After the upper limit has been reached, the controller will water for an additional 10% of the water time to increase deep watering.
Soil Moisture Levels
The amount of moisture held in the soil varies depending on the type of soil and the amount of time between watering events. When you’re using a sensor-based watering methodology, you should have a general understanding of the water holding capacity of various types of soil. You can learn more about soil moisture content, soil classification, and infiltration and water movement in Baseline’s document titled Watering with Soil Moisture Sensors.
For a brief description of the standard soil moisture content level, read: Overview of Soil Moisture Levels.
Steps for Configuring the Upper Threshold Watering Strategy
Perform the following steps to configure the controller for upper threshold watering:
Step 1 – Installing the biSensor
The biSensor needs to be placed in the effective root zone of the plant it is monitoring. Usually, the biSensor will be making the irrigation decision for many plants or even multiple zones of plants with similar water needs, so it should be placed in the effective root zone of a representative plant.
Take note of the serial number of the biSensor that you are installing in the landscape. You will need this number when you program the controller.
Follow the wiring instructions in the biSensor installation guide to connect the biSensor to the two-wire path or to the biSensor ports on the controller or on the powered biCoder.
Make sure that you maintain polarity on the wire connections.
Fasten the wiring with wire nuts, and then test communication with the controller before you complete the installation with waterproof connectors.
DeleteStep 2 – Setting Up a Primary Zone and Configuring the Zone Settings
After you have defined the area that will be watered by the sensor-based strategy, identify the zones that water that area. From those zones, select one to be associated with the sensor. Then, in the controller, designate that zone as the primary zone.
In addition to being the zone that is associated with a sensor, a primary zone is the zone within a scheduling group that all other linked zones are linked to. Changing the programming on this zone will adjust the programming on all linked zones, resulting in saved time and consistency.
Note: The primary zones of a program always run first.
Prerequisites
• biCoders have been assigned to zones.
• If you are using soil moisture sensors, they have been installed and detected by the controller.
• You know the number of the zone that waters the area where the sensor is installed.
To assign a primary zone
1. Turn the dial to the Zones position.
2. Verify that the number displayed in the Program field matches the program in which you want to set up the primary zone. If the zone is enabled in multiple programs and you want to set up the primary zone in a different program, press + or – to change the program number.
Note
A zone can only be a primary zone in one program. The programs that this zone is assigned to are listed in the lower-left corner of the screen.
3. Press + or – to select the zone that you want to assign as a primary zone.
4. Press Next to move to the Zone Mode field.
5. Press + or – until Primary displays in the Zone Mode field.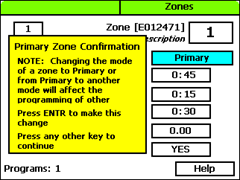
Note
If you change the mode of a zone to Primary or from Primary to another mode, you will potentially affect the programming of other zones. For example, a primary zone has 20 linked zones. If you change the mode of the primary zone to linked or timed, the links to the 20 zones will be broken.
To configure the zone settings
Upper threshold watering starts a watering cycle on each start time for the primary zone and adjusts the watering time to raise the moisture level back up to the upper limit (field capacity). The controller increases or decreases the water time, but it never adjusts more than twice your initial water time.
When you set a program to start based on a biSensor reading that is greater than the limit, you need to set up at least 3 soak cycles with a soak time that is at least twice as long as the cycle time. Soak cycling breaks the total runtime into shorter water “cycles” with “soak” periods in between to allow time for water to soak into the soil.
1. Press Next to move to the Water Time field.
- Set zone water times to apply ½ - ¾ inch of water.
- If you want to increase the value in the hours place, press +.
- If you want to change the value in the minutes place, press Next, and then press + or –.
Note
When you change the water time setting for a linked zone, notice that a percentage displays to the left of the Water Time field. This percentage compares the new value with the value in the Water Time field for the Primary zone and establishes a tracking ratio. The ratio will be maintained when changes are made to the primary zone’s water time.
Tip
Let the controller calculate the cycle time and soak time settings for you. Press the Next button to move to the minutes placeholder in the Soak Time field, and then press the Back button. The controller divides the time in the Water Time field by 3. This value is used for the cycle time and the default soak time is 30 minutes.
2. Press Next to move to the Cycle Time field. The cycle time defines the duration of each watering cycle interspersed with soak times.
Note
You cannot change the cycle time setting for a linked zone.
3. Press Next to move to the Soak Time field. The soak time defines the duration of each soaking cycle interspersed with watering times.
Note
You cannot change the soak time setting for a linked zone.
5. Press Next to move to the Enabled field. Press + to change the value to YES.
Step 3 – Creating a Scheduling Group
1. Turn the dial to the Zones position.
2. Verify that the number displayed in the Program field in the upper-left corner of the screen matches the program in which you want to set up the scheduling group. If the zone is enabled in multiple programs and you want to set up the scheduling group in a different program, press Next to move to the Program field, and then press + or – to change the program number.
3. In the Zone field, press + or – to select the zone that you want to link.
4. Press Next to move to the Zone Mode field.
5. Press + to change the entry in the field so it shows Linked-#.
6. To continue linking zones, press Enter until the number of the zone that you want to link displays in the Zone field at the top of the screen.
7. Repeat steps 5 and 6 until you have linked all the zones in the group to the primary zone for that group.
DeleteStep 4 – Assigning the biSensor to the Primary Zone
When you use soil moisture sensors (biSensors) to monitor your zones, you need to assign a biSensor to a primary zone. If you have not configured any primary zones, you will not be able to complete the following procedure. Refer to Step 2 in this document.
1. Turn the dial to the Smart Watering position.
2. The Moisture biSensor Assignments option should be highlighted. If it is not highlighted, press + or – to highlight it.
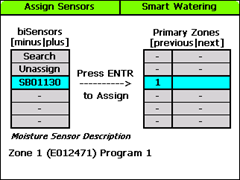
3. Press Enter. The Assign biSensors screen displays.
4. The Search option should be highlighted in the column on the left. If it is not highlighted, press + or – to highlight Search.
5. Press Enter. The system lists the serial numbers of all biSensors that it finds.
6. Press + or – to highlight the serial number of the biSensor that you want to assign, and then press Enter. The serial number moves from the list on the left to zone address on the right.
Step 5 – Configuring the biSensors and Setting Up Watering Strategies
1. Turn the dial to the Smart Watering position.
2. Press Next to select Moisture biSensor Setup, and then press Enter. The biSensor Setup screen displays.
3. If you have more than one biSensor installed and assigned to a primary zone, verify that the correct primary zone displays in the Sensor Primary Zone field (the serial number of the assigned biSensor displays in the lower-left corner of the screen). If the biSensor that you want to configure is not displayed in the field, press + or – to select the correct one.
4. Press Next to move to the Water Strategy field, and then press + or – to select the Upper Limit water strategy.
5. Press Next to move to the Upper Limit field. Press + or – to change the number in the field.
6. Press Next to move to the Limit Adjustment field.
7. Press Next to move to the Calibration Cycle field.
-
Never – No calibration cycle will be performed
-
One Time – A single calibration cycle will be performed at the next start time
-
Monthly – A calibration cycle will be performed each month at the first start time
8. When you have finished making changes, turn the dial to the RUN position.
Step 6 – Setting the Start Time for the Program
1. Turn the dial to the Programs position.
2. The Program Start Times Setup option should be highlighted. If it is not highlighted, press Next to highlight it.
3. Press Enter. The Start Times screen displays.
4. Verify that the number displayed in the Program field matches the program that you want to set start times for. If you want to select a different program, press + or – to change the program number.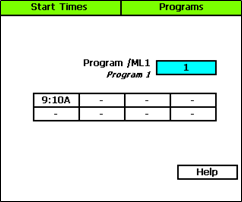
5. Press Next to move to the start times grid.
6. Press + or – to set the start time.
7. Press Next to move to the next cell in the start times grid, and then press + or – to set additional start times as needed.
DeleteStep 7 - Setting the Start Days for the Program
The upper threshold watering strategy is particularly useful for landscapes that need to be at the desired moisture level on a regular schedule, such as sports fields or heavy use parks. On these types of properties, damage to turf takes place when the soil is either too wet or too dry.
1. Turn the dial to the Programs position.
2. Press Next to highlight the Program Start Days Setup option, and then press Enter. The Start Days screen displays.
3. Verify that the number displayed in the Program field matches the program that you want to set start days for. If you want to select a different program, press + or – to change the program number.
4. Press Next to move to the Schedule Type field where you should select the schedule that best suits the type of property you are watering. If you want information about the schedule types that are available, refer to Setting Up the Start Days for a Program in the BaseStation 3200 User Manual or view the online help on the Start Days screen on the controller.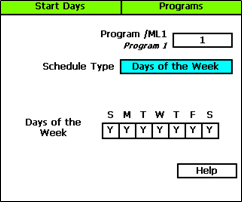
Step 8 - Setting Up the Water Windows for a Program
Water windows tell the controller when watering is allowed and not allowed. You can set water windows for either Weekly (shown on illustration below) or daily – when moving from weekly to daily, the weekly settings are copied to each day of the week.
Selecting daily water windows gives you hourly control of watering for each day of the week, and for each program. A white square will pause watering for that hour, or keep a start time from starting a program.
1. Turn the dial to the Programs position.
2. Press Next to select the Program Water Windows Setup option. The Water Windows screen displays.
3. Press + or – to select the program that you want to set up water windows for.
4. Press Next to move to the Water Window Type field, and then press + or – to select either Weekly or Daily.
5. Press Next to move to the Day of the Week field. If you are using the “Weekly” Water Window Type, you cannot change the setting in this field, but if you are using “Daily,” press + or – to display the day of the week that you want to set up water windows for.
6. Press Next to move to the ON/OFF field.
-
If the boxes in the grid are blue (allow watering), the field displays OFF. Press Enter to turn all the water windows off.
-
If the boxes in the grid are white (do not allow watering), the field displays ON. Press Enter to turn all the water windows on.
7. To make changes to the individual boxes in the grid, press Next. The color of the number in the first box of the grid changes to red (indicating that you can change the setting in that box).
- To change the water setting for the time/day represented by that grid, press +.
- To move to next box in the grid, press Next.
8. When you have finished making the changes, turn the dial to the RUN position.
Step 9 - Setting the Controller to Run
When you have finished making changes, turn the dial to the RUN position. content
Delete