


If you have a Baseline soil moisture sensor (biSensor™) installed in your landscaping and connected to your BaseStation 1000 irrigation controller, you can program the controller to water based on the moisture levels in the soil. This watering strategy can reduce outdoor water use by up to 62 percent or more over traditional irrigation methods. And, by watering your plants when needed, you can increase landscape health, promote deeper root growth, and make your plants more disease resistant.
When you configure the BaseStation 1000 to use the upper threshold watering strategy, you are telling the controller to start watering based on a day and start time and stop watering when the biSensor detects that the moisture content in the soil has reached the upper limit, which is equivalent to field capacity.
For areas that have a restricted schedule such as specific watering days or specific use schedules like sports fields, upper threshold (also referred to as “greater than limit” or “upper limit”) is a popular watering strategy. With upper threshold, you can choose which day and what time of day to start watering and the sensor will shut off watering when soil moisture reaches the upper threshold.
Soil Moisture Levels
The amount of moisture held in the soil varies depending on the type of soil and the amount of time between watering events. When you’re using a sensor-based watering methodology, you should have a general understanding of the water holding capacity of various types of soil. You can learn more about soil moisture content, soil classification, and infiltration and water movement in Baseline’s document titled Watering with Soil Moisture Sensors.
For a brief description of the standard soil moisture content level, read: Overview of Soil Moisture Levels.
Step 1 - Installing the biSensor
The biSensor needs to be placed in the effective root zone of the plant it is monitoring. Usually, the biSensor will be making the irrigation decision for many plants or even multiple zones of plants with similar water needs, so it should be placed in the effective root zone of a representative plant.
Take note of the serial number of the biSensor that you are installing in the landscape. You will need this number when you program the controller.
Follow the wiring instructions in the biSensor installation guide to connect the biSensor to the two-wire path or to the biSensor ports on the controller or on the powered biCoder.
Make sure that you maintain polarity on the wire connections.
Fasten the wiring with wire nuts, and then test communication with the controller before you complete the installation with waterproof connectors.
Step 2 – Assigning the biSensor in the Controller
1. On the BaseStation 1000 controller, press Search & Assign. The Search & Assign menu displays.
2. Press or to highlight the Moisture Sensor option, and then press OK to select it. The Moisture Sensor screen displays.
3. If the Device Assignment option is highlighted, press OK to select it. If Device Assignment is not highlighted, press or to highlight it, and then press OK. The Moisture Assignment screen displays.
4. When the Search option in the Action column is highlighted, press the OK button to search for biSensors. When the controller finds the devices, their serial numbers display in the Action column.
5. Press or to move through the list of devices in the Action column. Highlight the serial number of the biSensor that you installed in the landscape.
6. Press to move to the Moisture Sensor column.
7. Press or to move through the list. Highlight the number that you want to assign the biSensor to.
8. Press OK. The serial number of the device that you selected in the Action column now displays next to the number in the Moisture Sensor column.
Step 3 – Assigning the biSensor to the Zone
1. Press Search & Assign. The Search & Assign menu displays.
2. Press or to highlight the Moisture Sensor option, and then press OK to select it. The Moisture Sensor screen displays.
3. Press or to highlight the Device Setup option, and then press OK. The Moisture Device Setup screen displays.
4. Press or to highlight the biSensor number in the left column, and then press to move to the Enabled field.
- If the device is currently enabled, a checkmark displays in the Enabled field. Press + or – to remove the checkmark.
- If the device is currently disabled, there is no checkmark in the Enabled field. Press + or – to replace the checkmark.
5. Press to highlight the Zone field.
6. Press + or – to move through the list of zones, and then stop when the zone that you want to associate the biSensor with displays in the field.
Step 4 – Assign the biSensor Zones to a Program
Put all zones that you want to water with the upper threshold strategy into one program by giving them runtimes.
1. Press Program Setup. The Program Setup menu displays.
2. If the program that you are setting up to water based on biSensor readings displays in the upper-left corner of the screen, continue to step 3. Otherwise, press PRG until the program that you want to modify displays in the upper-left corner of the screen.
Note: To move backwards in the list of programs, press and hold PRG, and then press – repeatedly.
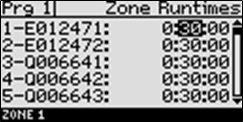
3. The Zone Runtimes option should be highlighted. If it is not highlighted, press or to highlight it, and then press OK. The Zone Runtimes screen displays. Zones are identified with a sequential number and by the serial number of the attached biCoder.
Note
Make sure the runtime is sufficient to get through the longest day interval during the hottest time of the year (typically ¾ inch of water).
4. Notice that the minutes placeholder in the Zone 1 field is highlighted.
- To move to the hour placeholder, press ï.
- To move to the seconds placeholder, press .
- To change the time, press + or – .
To rapidly increase or decrease the value, press and hold + or –.
To move to a different zone, press or .
Step 5 – Setting Up the Day & Time Start Condition for the Program
In the BaseStation 1000, a program is not active until you select a start condition for it. When you are using an upper threshold watering strategy, the program associated with the moisture sensor must have a day and time start condition.
1. Press Program Setup. The Program Setup menu displays.
2. If the program that you are setting up to water based on biSensor readings displays in the upper-left corner of the screen, continue to step 3. Otherwise, press PRG until the program that you want to modify displays in the upper-left corner of the screen.
Note: To move backward in the list of programs, press and hold PRG, and then press –repeatedly.
3. Press ò to highlight the Setup Prg. Start option, and then press OK. The Setup Prg. Start screen displays the list of start conditions.
Note
If you want the controller to display a message whenever a program starts, refer to Enabling Start, Pause, and Stop Messages in the BaseStation 1000 User Manual.
4. Press to highlight the Day & Time Start option, and then press OK. A checkmark displays next to the Day & Time Start option.
5. Press to go to the Day & Time Start menu.
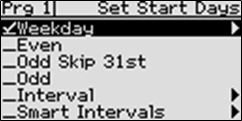
6. Press to highlight the Set Start Days option, and then press OK. The Set Start Days screen displays.
7. Press to highlight one of the following options, and then press OK:
-
Weekday – After you select the Weekday option, press to set up the weekdays when you want the program to start. By default, the boxes for the days of the week are marked with a checkmark, which indicates that the program will start every day. If you want to change a start day setting, press to select the day, and then press OK to change the setting.
-
Even – Select Even to start the program only on the even-numbered days of the month.
-
Odd Skip 31st – Select Odd Skip 31st to start the program only on the odd-numbered days of the month, but skip the 31st day in order to maintain an every-two-day schedule when crossing to a new month.
-
Odd – Select Odd to start the program only on the Odd numbered days of the month.
-
Interval – After you select the Interval option, press to set up a custom day interval. Press + or – to change the number in the Day Interval field.
-
Smart Interval – After you select the Smart Interval option, press to set up the intervals for each half month. The calendar displays boxes that represent the months of the year. The numbers in the boxes represent the day intervals for the first half and second half of the month. Press to move to the box where you want to change the interval, and then press + or – to change the number in the box.
Note
The Smart Interval-based watering schedule works best in regions where landscapes are irrigated all year. Baseline recommends that you use
the historical ET deficit data for your region to configure the intervals. To find the historical ET deficit data for your region, consult with your local Agricultural Cooperative Extension office.
8. Press BACK to return to the Day & Time Start menu.
9. Press to highlight the Set Start Times option, and then press OK. The Set Start Times screen displays.
Note: Each active program must have at least one start time. Programs that have no start times will not run.
10. Press to highlight the box for the start time that you want to change.
11. Press + or – to change the number in the box.
Note: To rapidly increase or decrease the number, press and hold + or –.
Step 6 – Setting Up the Soak Cycles for the Program
When you set a program to start based on a biSensor reading that is greater than the limit, you should set up at least 3 soak cycles with a soak time that is at least twice as long as the cycle time. Soak cycling breaks the total runtime into shorter water “cycles” with “soak” periods in between to allow time for water to soak into the soil.
1. Press Program Setup. The Program Setup menu displays.
2. If the program that you set up to water based on biSensor readings displays in the upper-left corner of the screen, continue to step 3. Otherwise, press PRG until the program that you want to modify displays in the upper-left corner of the screen.
Note: To move backward in the list of programs, press and hold PRG, and then press – repeatedly.
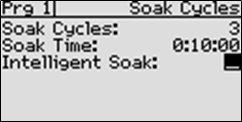
3. Press or to highlight the Soak Cycles option, and then press OK. The Soak Cycles screen displays.
4. Notice that the Soak Cycles field is highlighted. Press + or – to change the number to indicate how many soak cycles will occur.
5. Press to highlight the Soak Time field. Press + or – to change the time in this field to indicate how long you want the applied water to soak in.
6. Review the setting in the Intelligent Soak field. If there is a checkmark in the field, press to highlight the field, and then press + or – to remove the checkmark. You must disable intelligent soak cycles for upper threshold watering to work properly.
Step 7 - Setting Up the Stop Condition and the Limit
When you use the upper threshold watering strategy, you are telling the controller to stop watering when the biSensor detects that the moisture content in the soil has reached the upper limit, which is equivalent to field capacity.
You can use one of the following methods to determine the upper threshold value.
- Manually identify field capacity by pouring a couple of gallons of water directly over the spot where the sensor is buried to saturate the soil around the sensor. Over the next several hours, the water will spread out through capillary action. Wait at least 24 hours, and then take a sensor reading. This value is the field capacity/upper threshold.
- Run a biSensor calibration. When you enable calibration, the process either starts immediately or on the next day, and time start. The program puts down 150% of the required water (based on the runtime of the zone) and then waits for 24 hours. The calibration reading is taken when the soil moisture is at field capacity.
Manual Identification and biSensor Read
1. Pour at least two gallons of water directly over the spot where the sensor is buried.
2. Temporarily disable the program so the area won’t be watered for at least 24 hours:
a. On the BaseStation 1000 controller, press Program Setup. The Program Setup menu displays.
b. Press PRG until the program that you set up to water-based on biSensor readings displays in the upper-left corner of the screen.
Note: To move backward in the list of programs, press and hold the PRG button, and then press – repeatedly.
c. Press to highlight the Enable/Disable option, and then press OK.
d. Press OK to remove the checkmark from the Enabled field.
3. Wait 24 hours from the time when you saturated the sensor.
4. On the BaseStation 1000 controller, press Test. The Test menu displays.
5. Press or to highlight the Test Moisture Sensor option, and then press OK. The Test Moisture Sensor screen displays.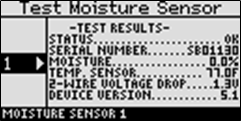
6. Press or to select the biSensor that is installed in the landscape.
7. Press OK to test the biSensor.
Note
If any zones or programs are running when the test is activated, watering will pause for 10 minutes. The test results display the moisture percentage.
8. Write down the moisture reading.
9. Press Program Setup. The Program Setup menu displays.
10. Make sure that the program that you set up to water-based on biSensor readings displays in the upper-left corner of the screen. If it doesn’t, press PRG until the correct program displays.
Note
To move backward in the list of programs, press and hold the PRG button, and then press – repeatedly.
11. Press to highlight the Setup Prg. Stop option, and then press OK. The Setup Prg. Stop screen displays the list of stop conditions.
12. Press to highlight the Moisture Stop option, and then press OK. A checkmark displays next to the Moisture Stop option.
13. Press to configure the moisture stop settings. The Moisture Stop screen displays.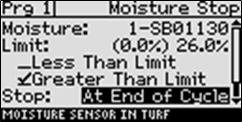
14. Press to highlight the Limit field, and then press + or – to change the number in the field to match the moisture reading that you wrote down in step 8.
Note
In the Limit field, the value in parentheses is the most current reading from the biSensor. Keep in mind that the biSensor is read every 10 minutes.
15. Press to highlight the Greater Than Limit field, and then press OK. A checkmark displays next to the Greater Than Limit option.
16. Review the setting in the Stop field, and then perform one of the following:
- If At End of Cycle displays in the field, continue to step `7.
- If Immediately displays in the field, press + or – to change the setting to At End of Cycle.
Continue to step 17.
17. Make sure that Start displays in the Calibration field. This means the calibration is not enabled.
18. Return the program status to Enabled.
a. Press Back to return to the Program Setup menu.
b. Press to highlight the Enable/Disable option, and then press OK.
c. Press OK to replace the checkmark in the Enabled field.
19. Set the controller to run by pressing the RUN button.
Running a biSensor Calibration
The biSensor can automatically set an upper threshold for you based on the measurement of field capacity.
1. Press Program Setup. The Program Setup menu displays.
2. Make sure that the program that you set up to water-based on biSensor readings displays in the upper-left corner of the screen. If it doesn’t, press the PRG button until the correct program displays.
Note: To move backward in the list of programs, press and hold PRG, and then press – repeatedly.
3. Press to highlight the Setup Prg. Stop option, and then press OK. The Setup Prg. Stop screen displays the list of stop conditions.
4. Press to highlight the Moisture Stop option, and then press OK. A checkmark displays next to the Moisture Stop option.
5. Press to configure the moisture stop settings. The Moisture Stop screen displays.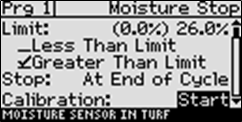
6. Press to highlight the Greater Than Limit field, and then press OK. A checkmark displays next to the Greater Than Limit option.
7. Review the setting in the Stop field, and then perform one of the following:
- If At End of Cycle displays in the field, continue to step 8.
- If Immediately displays in the field, press + or – to change the setting to At End of Cycle. Continue to step 8.
8. Press to highlight the Calibration field.
- If the calibration has not been enabled, the Start option displays on the right side of the screen. To start the calibration, highlight the Start option, and then press OK.
- If the calibration has been enabled, the Stop option displays on the right side of the screen. To stop the calibration, press + or - to highlight the Stop option, and then press the OK.
9. Set the controller to run by pressing RUN.
After you enable the calibration, the process either starts immediately or on the next day, and time start. The controller adds 50% to the runtime of each zone in the program that’s being calibrated. This additional runtime should water the landscape up to Saturation level. When the program is finished, the controller waits 24 hours for the landscape to dry to field capacity, and then it takes the calibration reading. That value is automatically entered into the Limit field.
After the calibration cycle runs one time, it is disabled in the controller.
Step 8 – Setting the Controller to Run
When you have finished making changes, press RUN.