


LiveView™ makes your controller accessible at anytime from anywhere, with any Internet-accessible device, just as if you were standing in front of it.
If your BaseManager subscription expires, you will have LiveView access only in BaseManager until you renew your subscription. Refer to Understanding BaseManager Subscriptions.
1. Make sure that the irrigation controller you want to work with is displayed in the BaseManager footer. To select a different controller, click the "Menu" icon  in the upper-left corner of the BaseManager page, and then click "Sites and Controllers". Continue drilling down until you can select the desired controller.
2. Click the "LiveView" tab. The LiveView page shows the interface of the selected controller.
LiveView for BaseStation 1000 Irrigation Controllers
LiveView is a real-time view of the front controller panel. The display shows the current state of the controller. The buttons are used to select programming elements, change their values, and initiate operations like testing a zone. Use the mouse to point to the button that you want to activate and then click the left mouse button.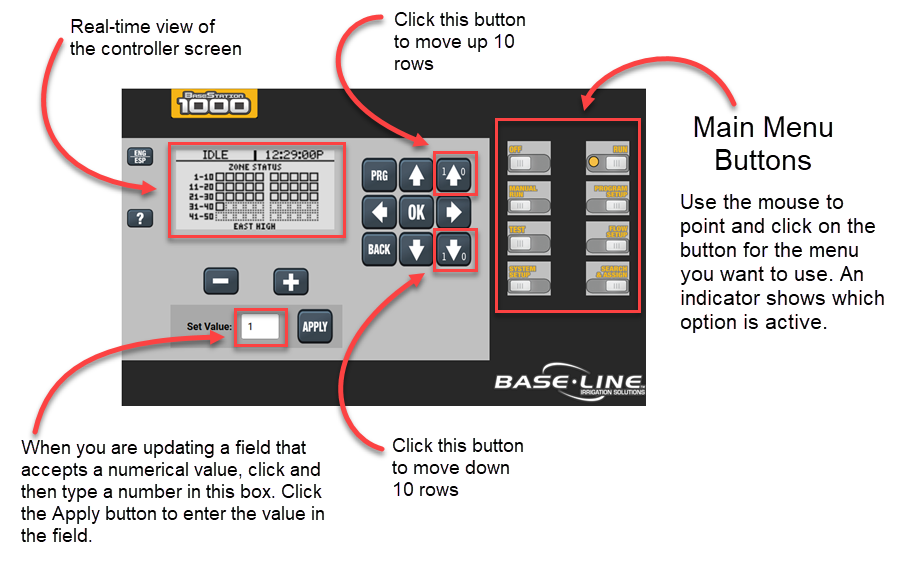
- Click the main menu buttons on the right side of the controller panel to select the various operating or programming menus of the controller. An indicator shows the menu that is active.
- Click the "+" button to increase the value of the highlighted field, or sequence through the available options in the selected field.
- Click the "–" button to decrease the value of the highlighted field, or sequence through the available options in the selected field.
- Click the "PRG" button to select the program that you want to modify.
- Click the arrow buttons to move within a screen.
- Click the "OK" button to select an option or perform an action.
- Click the "BACK" button to return to a previous screen or cancel an action.
- When you are updating a field that accepts a numerical value, click and type a number in the "Set Value" field. Click the "Apply" button to enter the value in the field.
- Click the up arrow button labeled with the number 10 to move up 10 rows.
- Click the down arrow button labeled with the number 10 to move down 10 rows.
LiveView for BaseStation 3200 Irrigation Controllers
LiveView is a real-time view of the front controller panel. The display shows the current state of the controller. The buttons are used to select programming elements, change their values, and initiate operations like testing a zone. Use the mouse to point to the button that you want to activate and then click the left mouse button.

- Click the dial position buttons on the right side of the controller panel to select the various operating or programming menus of the controller. An indicator shows the menu that is active.
- Click the "+" button to increase the value of the highlighted field, or sequence through the available options in the selected field.
- Click the "–" button to decrease the value of the highlighted field, or sequence through the available options in the selected field.
- Click the "Previous" button to move the highlighted selection to the previously selected field on the display.
- Click the "Next" button to move the highlighted selection to the next field on the display.
- Click the "Back" button to return to a previous screen or cancel an action.
- Click the "Enter" button to select an option or perform an action.
- When you are updating a field that accepts a numerical value, click and type a number in the "Set Value" field. Click the "Send" button to enter the value in the field.
- Click the "+" button labeled with the number 10 to increase a numerical value by 10.
- Click the "–" button labeled with the number 10 to decrease a numerical value by 10.