If you have a Baseline soil moisture sensor (biSensor™) installed in your landscaping and connected to your BaseStation 1000 irrigation controller, you can program the controller to water based on the moisture levels in the soil. This watering strategy can reduce outdoor water use by up to 62 percent or more over traditional irrigation methods. And, by watering your plants when needed, you can increase landscape health, promote deeper root growth, and make your plants more disease resistant.
The BaseStation 1000 irrigation controller supports several biSensor-based watering strategies, but Baseline recommends the lower threshold (also referred to as “less than limit” or “lower limit”) configuration as a general watering strategy.
Overview of Soil Moisture Levels
The amount of moisture held in the soil varies depending on the type of soil and the amount of time between watering events. When you’re using a sensor-based watering methodology, you should have a general understanding of the water holding capacity of various types of soil. We’ve included a brief description of the standard soil moisture content levels in this document. You can learn more about soil moisture content, soil classification, and infiltration and water movement in Baseline’s document titled Watering with Soil Moisture Sensors.
Soil moisture content is identified by the following levels:
Saturation: At the saturation level, nearly all of the spaces between soil particles are filled with water. As a rule, irrigators do not want to saturate the soil because it cuts off the plant’s supply of oxygen, which, in effect, drowns the plant.
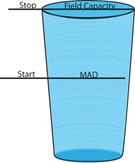
Field Capacity: When soil is at the field capacity level, it means that all excess moisture has drained freely from that soil. The amount of remaining moisture is the field capacity. To irrigate properly, you would turn off the water when the soil in the root zone of the plants reaches field capacity. A Baseline biSensor measures field capacity in the calibration process and uses this value as the basis for other settings.
Maximum Allowed Depletion (MAD): In most cases, the maximum allowed depletion level is just before the plants begin to show visible signs of stress. Irrigators typically start watering at or before MAD is reached because they don’t want their landscapes to show signs of stress. MAD is not measured because it is based on observation and opinion. The biSensor can automatically set a MAD threshold for you based on the measurement of field capacity; however, keep in mind, this setting is based on a calculation, and we encourage our customers to fine tune their thresholds.
Permanent Wilting Point: At the permanent wilting point, the level of water in the soil is not sufficient to meet the plant’s needs.
When you configure the BaseStation 1000 to use the lower threshold watering strategy, you are telling the controller to start watering when the biSensor detects that the moisture content in the soil is below the lower limit, which is equivalent to the maximum allowed depletion (MAD). The controller stops watering when it reaches the end of the runtime. Then the biSensor will monitor the moisture content until the MAD level is reached and watering will start again. 
Note
Make sure your program’s runtime is sufficient to raise the moisture content in the soil to field capacity. You should put down at least ½ - ¾ inch of water each time the controller is allowed to water.
Overview of the Steps for Configuring the Lower Threshold Watering Strategy
Perform the following steps to configure the controller for lower threshold watering:
Step 1 – Install the biSensor in the landscaping according to the instructions that came with the device.
Step 2 – In the BaseStation 1000 controller, search for and assign the biSensor.
Step 3 – Set up the biSensor and assign that sensor to the zone that will water it.
Step 4 – Assign the zones in the area that is monitored by the biSensor to a program by giving the zones runtimes.
Step 5 – Set up the Soak Cycles for the program.
Step 6 – Set a Moisture Start condition for the program.
Step 7 – Set the limit: you can find the limit manually or you can calibrate the biSensor to find the limit.
Step 8 – Set the controller to run.
Step 1- Installing the biSensor
The biSensor needs to be placed in the effective root zone of the plant it is monitoring. Usually the biSensor will be making the irrigation decision for many plants or even multiple zones of plants with similar water needs, so it should be placed in the effective root zone of a representative plant.
Take note of the serial number of the biSensor that you are installing in the landscape. You will need this number when you program the controller.
Follow the wiring instructions in the biSensor installation guide to connect the biSensor to the two-wire path or to the biSensor ports on the controller or on the powered biCoder.
Make sure that you maintain polarity on the wire connections.
Fasten the wiring with wire nuts, and then test communication with the controller before you complete the installation with waterproof connectors.
DeleteStep 2- Assigning the biSensor in the Controller
1. On the BaseStation 1000 controller, press Search & Assign. The Search & Assign menu displays.
2. Press ñ or ò to highlight the Moisture Sensor option, and then press OK to select it. The Moisture Sensor screen displays.
3. If the Device Assignment option is highlighted, press OK to select it. If Device Assignment is not highlighted, press ñ or ò to highlight it, and then press OK. The Moisture Assignment screen displays.
4. When the Search option in the Action column is highlighted, press OK to search for biSensors.
When the controller finds the devices, their serial numbers display in the Action column.
5. Pressñ or ò to move through the list of devices in the Action column. Highlight the serial number of the biSensor that you installed in the landscape.
6. Press ð to move to the Moisture Sensor column.
7. Press ñ or ò to move through the list. Highlight the number that you want to assign the biSensor to.
8. Press OK. The serial number of the device that you selected in the Action column now displays next to the number in the Moisture Sensor column.
DeleteStep 3- Assigning the biSensor to the Zone
1. Press Search & Assign. The Search & Assign menu displays.
2. Press ñ or ò to highlight the Moisture Sensor option, and then press OK to select it. The Moisture Sensor screen displays.
3. Press ñ or ò to highlight the Device Setup option, and then press OK. The Moisture Device Setup screen displays.
4. Press ñ or ò to highlight the biSensor number in the left column, and then press ð to move to the Enabled field.
- If the device is currently enabled, a checkmark displays in the Enabled field. Press + or – to remove the checkmark.
- If the device is currently disabled, there is no checkmark in the Enabled field. Press + or – to replace the checkmark.
5. Press ò to highlight the Zone field.
6. Press + or – to move through the list of zones, and then stop when the zone that you want to associate the biSensor with displays in the field.
DeleteStep 4 - Assign the biSensor Zones to a Program
Put all zones that you want to water with the lower threshold strategy into one program by giving them runtimes.
1. Press Program Setup. The Program Setup menu displays.
2. If the program that you want to modify displays in the upper-left corner of the screen, continue to step 3. Otherwise, press PRG until the program that you want to modify displays in the upper-left corner of the screen.
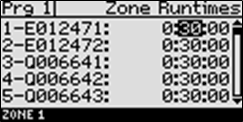
3. The Zone Runtimes option should be highlighted. If it is not highlighted, press ñ or ò to highlight it, and then press OK.The Zone Runtimes screen displays. Zones are identified with a sequential number and by the serial number of the attached biCoder.
4. Notice that the minutes placeholder in the Zone 1 field is highlighted. 
- To move to the hour placeholder, press ï.
- To move to the seconds placeholder, press ð.
- To change the time, press + or – .
To move to a different zone, press ñ or ò .
DeleteStep 5 - Setting Up the Soak Cycles for the Program
When you set a program to start based on a biSensor reading that is less than the limit, you should set up at least 3 soak cycles with a soak time that is at least twice as long as the cycle time, and enable Intelligent Soak Cycles™. Soak cycling breaks the total runtime into shorter water “cycles” with “soak” periods in between to allow time for water to soak into the soil. Intelligent Soak Cycles prioritize runtimes for zones that have already started to water over zones that have not started in order to maximize watering efficiency and minimize total irrigation time.
1. Press Program Setup. The Program Setup menu displays.
2. If the program that you want to modify displays in the upper-left corner of the screen, continue to step 3. Otherwise, press the PRG button until the program that you want to modify displays in the upper-left corner of the screen.
Note
To move backward in the list of programs, press and hold the PRG button, and then press the – button repeatedly

3. Press or to highlight the Soak Cycles option, and then press OK. The Soak Cycles screen displays.
4. Notice that the Soak Cycles field is highlighted. Press + or – to change the number to indicate how many soak cycles will occur.
5. Press to highlight the Soak Time field. Press + or – to change the time in this field to indicate how long you want the applied water to soak in.
6. Press to highlight the Intelligent Soak field. If you want to enable Intelligent Soak for this program, press OK to display a checkmark in the field.
When you enable the Intelligent Soak™ feature, the BaseStation 1000 uses intelligent watering algorithms that apply cycles in the optimal order to maximize water penetration and minimize evaporation loss. If there are many zones in a program, zones will be cycled and soaked until all have been completed. Zones that have completed their soak cycles are prioritized higher than zones that are still waiting to water so the first zones to start watering will be the first to complete.
DeleteStep 6 - Setting Up a Moisture Start Condition for the Program
1. On the BaseStation 1000 controller, press Program Setup. The Program Setup menu displays.
2. Press the PRG button until the program that you set up to water-based on biSensor readings displays in the upper-left corner of the screen.
Note
To move backward in the list of programs, press and hold the PRG button, and then press the – button repeatedly.
3. Press to highlight the Setup Prg. Start option, and then press OK. The Setup Prg. Start screen displays the list of start conditions.
4. Press to highlight the Moisture Start option, and then press OK. A checkmark displays next to the Moisture Start option.
5. Press to configure the moisture start settings.
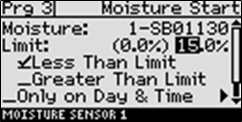
6. Notice that the serial number for one of your biSensors is highlighted in the Moisture field. If this is the serial number for the biSensor that monitors the zones in this program, no change is required. If you need to use a different biSensor, press the + or – button to select a different serial number.
7. Press to highlight the Limit field. Leave the default entry in the field for now. You will enter the limit later.
Note
In the Limit field, the value in parentheses is the most current reading from the soil moisture biSensor. Keep in mind that the biSensor is read every 10 minutes.
8. Press to highlight Less Than Limit, and then press OK.
9. Make sure Only on Day & Time is not selected.
10. Do not start the Calibration.
DeleteStep 7 - Setting the Limit
When you use the lower threshold watering strategy, you are telling the controller to start watering when the biSensor detects that the moisture content in the soil is below the lower limit, which is equivalent to, or slightly above, the maximum allowed depletion (MAD).
Remember that MAD is typically based on observation and opinion. You can use one of the following methods to determine the lower threshold value.
- Allow the landscape to dry out to the point where it should be watered again, and then take a biSensor reading. This value is the lower threshold.
- Run a biSensor calibration. When you enable calibration, the process either starts immediately or at the next day and time start. The program puts down 150% of the required water (based on the runtime of the zone) and then waits for 24 hours. The calibration reading is taken when the soil moisture is at field capacity, and the MAD limit is calculated mathematically.
Taking a biSensor Reading and Manually Entering the Lower Threshold
1. Run the program that the biSensor is associated with.
2. Temporarily disable the program to allow the landscaping to dry to what you would consider MAD:
a. On the BaseStation 1000 controller, press Program Setup. The Program Setup menu displays.
b. Press the PRG button until the program that you set up to water based on biSensor readings displays in the upper-left corner of the screen.
3. Press to highlight the Enable/Disable option, and then press OK.
4. Press OK to remove the check mark from the Enabled field.
5. Allow the landscape to dry out to the point where it should be watered again.
6. On the BaseStation 1000 controller, press Test. The Test menu displays.

8. Press or to select the biSensor that is installed in the landscape.
9. Press OK to test the biSensor.
10. Write down the moisture reading.
11. Press Program Setup. The Program Setup menu displays.
12. Make sure that the program that you set up to water-based on biSensor readings displays in the upper-left corner of the screen. If it doesn’t, press the PRG button until the correct program displays.
13. Press to highlight the Setup Prg. Start option, and then press OK. The Setup Prg. Start screen displays the list of start conditions.
14. Press to highlight the Moisture Start option, and then press OK. A checkmark displays next to the Moisture Start option.
15. Press to configure the moisture start settings. The Moisture Start screen displays.
16. Press to highlight the Limit field, and then press + or – to change the number in the field to match the moisture reading that you wrote down in step 8.
17. Make sure there is a checkmark in the Less Than Limit field. If not, press the button to highlight the field, and then press the OK button.
18. Press the button to highlight the Only on Day & Time field, and then press the OK button.
19. Press the button to configure the day and time start settings. If you need help configuring the settings, refer to Setting Start Conditions for a Program in the BaseStation 1000 User Manual.
20. Make sure that Start displays in the Calibration field. This means the calibration is not enabled.
21. Return the program status to Enabled:
a. Press Back to return to the Program Setup menu.
b. Press to highlight the Enable/Disable option, and then press OK.
c. Press OK to replace the checkmark in the Enabled field.
22. Set the controller to run by pressing the RUN button.
Running a biSensor Calibration
The biSensor can automatically set a lower threshold for you based on the measurement of field capacity; however, keep in mind, this setting is based on a calculation, and we encourage our customers to fine-tune their thresholds.
1. Press Program Setup. The Program Setup menu displays.
2. Make sure that the program that you set up to water-based on biSensor readings displays in the upper-left corner of the screen. If it doesn’t, press the PRG button until the correct program displays.
3. Press to highlight the Setup Prg. Start option, and then press OK. The Setup Prg. Start screen displays the list of start conditions.
4. Press to highlight the Moisture Start option, and then press OK. A checkmark displays next to the Moisture Start option.
5. Press to configure the moisture start settings. The Moisture Start screen displays.
6. Press to highlight the Calibration field.
 7. If the calibration has not been enabled, the Start option displays on the right side of the screen. To start the calibration, highlight the Start option, and then press OK.
8. If the calibration has been enabled, the Stop option displays on the right side of the screen. To stop the calibration, highlight the Stop option, and then press OK.
9. Set the controller to run by pressing RUN.
After you enable the calibration, the process either starts immediately or on the next day, and time start. The controller adds 50% to the runtime of each zone in the program that’s being calibrated. This additional runtime should water the landscape up to Saturation level. When the program is finished, the controller waits 24 hours for the landscape to dry to field capacity, and then it takes the calibration reading. The controller uses this reading to calculate the lower threshold, and that value is automatically entered into the Limit field.
After the calibration cycle runs one time, it is disabled in the controller.
Delete


