


The OFF mode will cause the WeatherTRAK controller to stop current and future irrigation indefinitely. Depletion for stations in auto will be accumulated and the controller will still run the daily valve check.
The Shutdown mode will cause the WeatherTRAK controller to stop current and future irrigation indefinitely. Depletion for stations in auto will be accumulated, the normally open master valve will be energized and the controller will still run the daily valve check.
- The shutdown mode should not be used long term as continuous power to a solenoid may cause premature solenoid failure.
| Controller Mode | Behavior |
| Off |
|
| Winterized |
|
| Shutdown |
|
To set the WeatherTRAK controller to Off or Shutdown Mode
From the Controller
1. Press the OFF button. A 5-second countdown will begin, turning off the controller.
- For Shutdown: Press OFF, then press + or – until the Shutdown screen displays. A 5-second countdown will begin, shutting down the controller.
2. To turn the controller back on, press the * button. The controller should power up again within 10 seconds.
From WTC
1. From the home page, click Smart Irrigation.
2. Click Manage Controller tab.
3. Use the drop-down box in the controller display window to select the desired controller.
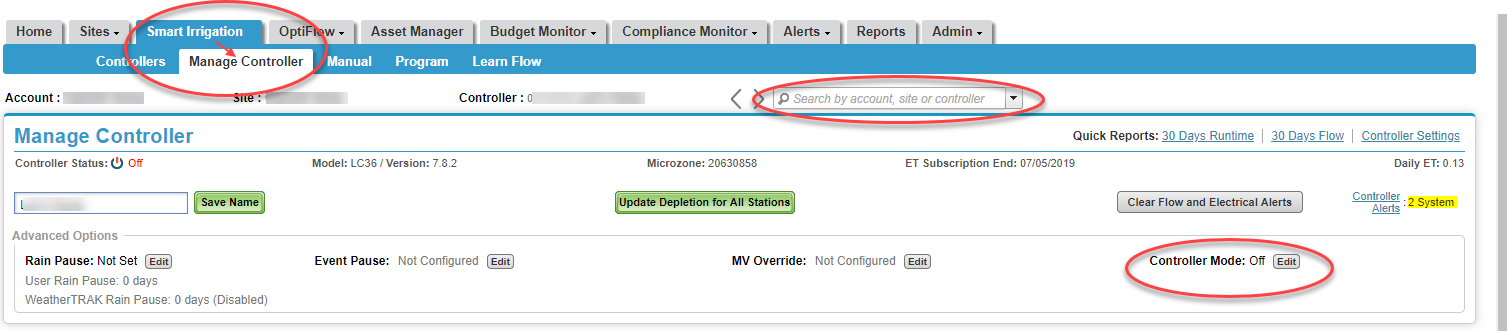
4. Next to Controller Mode click Edit. A pop-up displays.
5. Click X, then click the blue Update Mode bar.
6. To undo, click Controller Mode > Edit > On > Update Mode.
From Mobile
From the Sites List page, use the Select button associated with the name of the site containing the Controller(s) you want to change the Controller Mode for.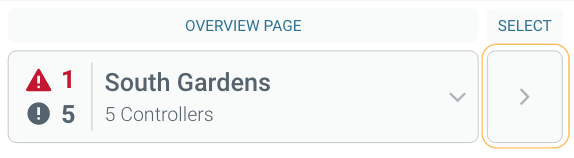
The Controller List page displays the Controllers found on the selected Site.
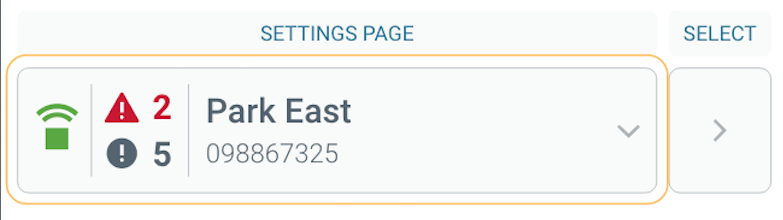
Select the Controller Settings page button of the controller you want to change the Controller Mode for.
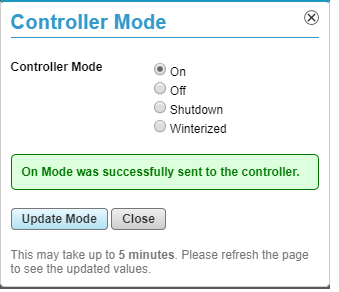
Select the Controller Mode button at the top right of the page.
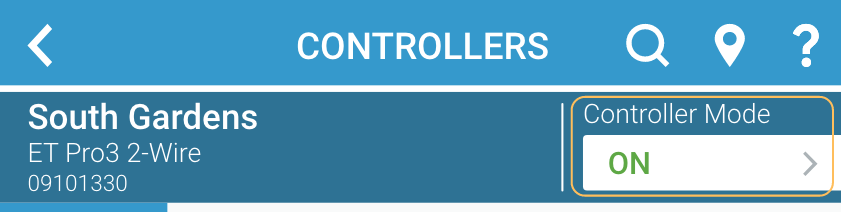
Choose from the four Controller Mode options, as shown.
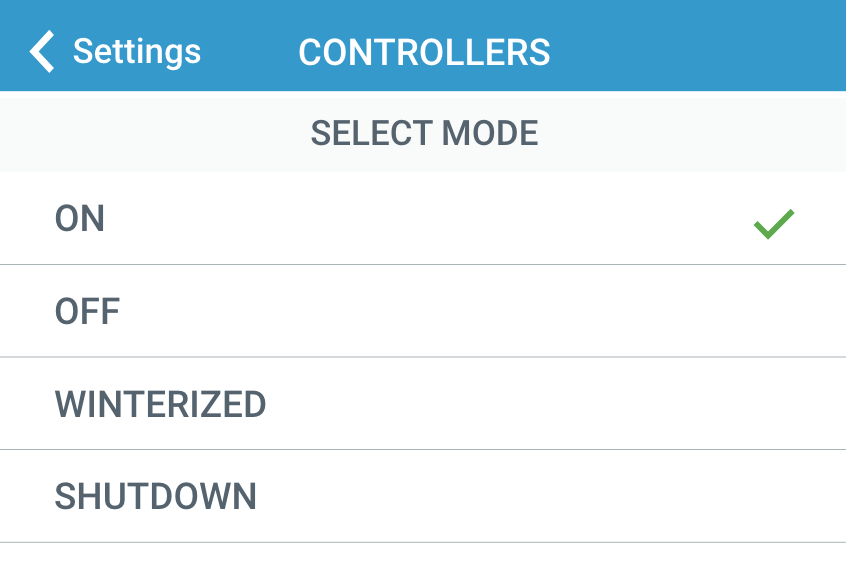
Once selected the new Controller Mode will be displayed and will blink on & off until the mode has been applied. Once applied, the Controller Mode will stop blinking and the new mode will be shown.

Winterize Mode
The Winterize mode is used for controllers in colder climates where prolonged ambient and ground freezing temperatures occur, winterizing irrigation systems is common practice. This process removes water from the mainline and lateral piping so that the frozen water does not cause pipes to burst, resulting in damage to irrigation components. The typical practice is to use compressed air to blow excess water out the lines, drain and cover the backflow device with an insulating blanket, and turn off the controller.
While in Winterized Mode, the controller stops all scheduled irrigation indefinitely and closes a normally open master valve. The controller will continue to receive daily ETs, but station depletion remains constant. Manual irrigation and MV override are disabled; however, the runtime valve test will continue.
The winterization process involves shutting off and draining all irrigation components per irrigation best practices. This includes, but is not limited to:
- Shutting off the main water source that feeds the irrigation system before the backflow prevention device
- Removing water from all irrigation pipes and components
1. Clearing Alerts and Resetting Depletion Values
Before beginning the process of winterizing your controller, it is essential to fix and clear all alerts. It is also important to reset any high depletion values to zero. To learn how to read the following articles:
- Troubleshooting and Clearing Valve Alerts
- Troubleshooting and Clearing Flow Alerts
- Resetting High Depletion Values
2. Turn off the Flow Sensor
From the Controller
1. Press FLOW.
2. Press à until SELECT FLOW OPTION displays.
3. Press + or – to select Points of Connection.
4. Press à until FS (flow Sensor) is underlined.
5. Press + or – to select OFF.
6. Change mode back to ON, upon completion, if required.
From WT Central
1. Go to www.weathertrak.net and log in.
2. From the Smart Irrigation tab on the home page, click Program.
3. In the drop-down menu at the top, choose the controller you are turning off flow to.
4. Scroll down to the Flow section. Next to Flow Mode click Off.
5. Scroll down and click the green Save & Send button.
6. Change mode back to ON, upon completion, if required.
From WT Mobile
1. From the home screen, select the site.
2. Go to the controller's Settings page.
3. Go to the Program tab.
4. Under FLOW choose a POC.
5. On the POC page, change the flow sensor (FS1, for example) mode to OFF.
6. Apply changes.
7. Change mode back to ON, upon completion, if required.
3. Remove Water From Mainline and Lateral Piping
CAUTION: NEVER blow compressed air across an irrigation flow sensor. It spins the internal components more than 20 times faster than designed. This will void the warranty for this sensor. We recommend finding a place to plug the air compressor into the irrigation system AFTER the flow sensor. For example, a blow-out port or quick coupler.
Note
Winterizing an OptiFlow XR controller can only be done while in the Maintenance Mode.
To learn how to unlock the OptiFlow controller and place it into Maintenance mode, read: Unlocking an OptiFlow Controller
Manual Irrigation From the controller
Manual operation can be set for all stations to operate with the same run times. Irrigation will start immediately on Station 1. The display will change to reflect the current irrigating station.
1. Press MANUAL/TEST.
2. Press + or – to select All Stations.
3. Press ß or à to select the station you want to manually water.
4. Press + or – to select the number of minutes you would like to manually water for. Irrigation will begin immediately. The controller will immediately begin to irrigate stations 01 through the Max Active Stations for the selected runtime in numerical order.
5. If you need to stop irrigation during a manual run for any reason, press – to set the minutes back to 0. You can also press and hold OFF for 5 seconds, then press RUN to finish.
Manual Irrigation From WT Central
1. From the Smart Irrigation tab on the home page, click Manual.
2. From the drop-down menu at the top, choose the controller you are running manual irrigation for.
3. Choose the desired runtime from the drop-down list in the Set Runtime field.
4. Click the checkboxes for the stations you would like to run manually.
5. Scroll down and click the green Save & Send button.
Manual Irrigation From WT Mobile
Multiple Stations
To manually irrigate multiple Stations, from the MULTIPLE tab:
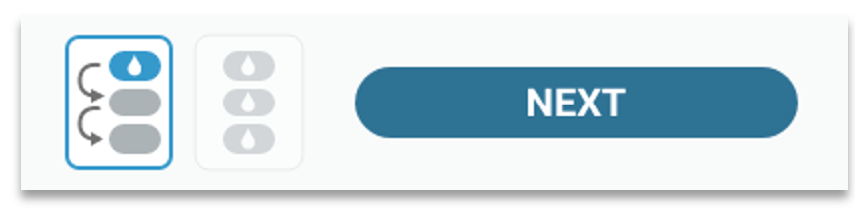
There are two methods of manual irrigation that can occur from this tab, depending on the WeatherTRAK controller type. Stacked and Overlap options will become available for any OptiFlow enabled controller, otherwise Stacked will be the only method performed.
- Stacked mode (standard controllers) allows for the selection of as many Stations as there are associated with the controller.
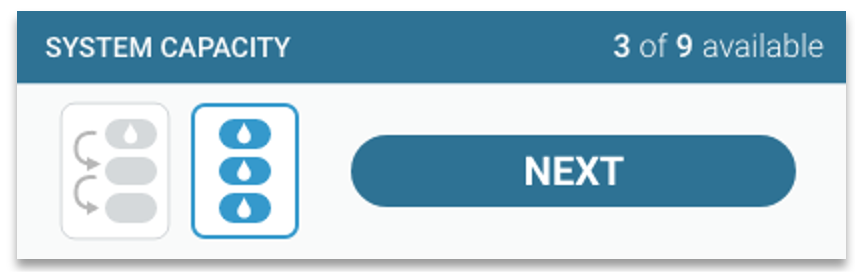
- Overlap mode (OptiFlow enabled controllers) will present a "System Capacity" bar that will show you how many Stations have been selected out of the nine (9) total allowed. This limit is based on the controller's transformer's ability to power up to nine (9) Stations at one time.
Stacked: The selected Stations will operate one at a time, sequentially.
Overlap: The selected Stations will operate at the same time, simultaneously.
1. Change the default time to the amount the Stations need to manually irrigate for by pressing the Default Timer button and selecting a time from the list. The new time will be reflected in the button.

2. Select each Station by pressing the Station's corresponding Timer button, which will populate the button with the default time - turning it blue.

3. Once the Stations have been selected, press NEXT to see a list of those Stations.

If in Stacked mode, the list of Stations can be further modified on this new page. Select a Station and continue to press & hold your finger to the screen to enable drag & drop rearranging. Reorder the list of Stations, as desired.
In both Stacked and Overalp mode, select the Station's timer button to assign it a new time.

4. Depending on the mode, press START (Stacked), or START ALL (Overlap) to begin operation.
5. To stop the Station(s) from operating, press the STOP, or STOP ALL button at any time.