Table of Contents
Step 1 - Inspect the Controller for DamageStep 2 - Disconnect Power and Station WiresStep 3 - Replace the FuseThis article will provide troubleshooting and diagnostic steps to perform when a WeatherTRAK controller encounters issues with blown or popping fuses.
Step 1
Inspect the Controller for Damage
Before disconnecting anything on the controller, you will need to visually inspect the unit for any burn, water, or animal/insect damage. This type of damage would not be an RMA but a chargeable sales order for replacement. If you see damage to the unit, stop and call Customer Support for further assistance.
Step 2
Disconnect Power and Station Wires
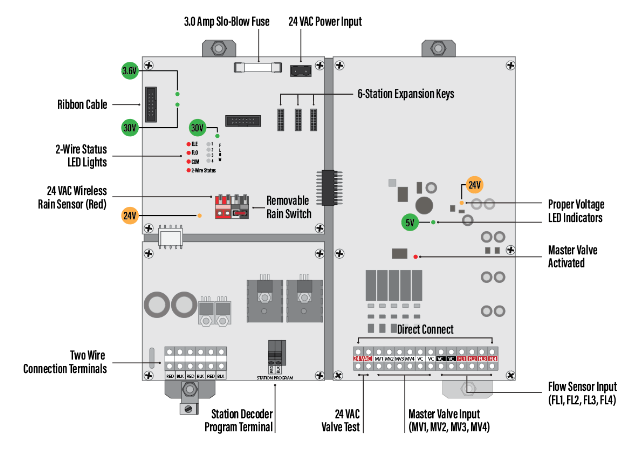
Refer to the illustrations below (depending on your controller type) for locations of connections, fuses, and cables.
ET Pro3/OptiFlow XR Board:

ET Pro3/OptiFlow XR 2-wire Board:
 LC+ Controller Board:

1. For ET Pro3/OptiFlow XR controllers, disconnect the power connector from the 24 VAC power input terminal. For LC+ controllers, disconnect from AC power source.
2. Remove the fuse and set it aside.
3. Disconnect the ribbon cable from the back of the command module as shown below.
 4. Disconnect the rain sensor if there is one.
5. Disconnect station wires. If the station wires are not labeled just remove the common wires.
Step 3
Replace the Fuse
1. Connect replacement fuse.
2. Reconnect power connector. Confirm fuse holds and lights are visible - specifically 30V & 3.6v and 24 a/c.
3. Reconnect ribbon cable to back of control panel and observe mini-chassis condition. If the fuse blows immediately the cause is due to a faulty panel. If the fuse does not blow, the 3.6v and 3v green lights should be visible.
4. If the panel is determined to be faulty, proceed with contacting Customer Support to inquire about an RMA and replacement.
5. If no fault is found and the troubleshooting steps resolve the issue, verify everything is reconnected and functioning properly.


